How to Pattern Bucks With Trail Cameras
Filed under: Hunting Blog, Trail Cameras
Most of us would enjoy preparing to hunt knowing that the results of our scouting gave us much confidence that a mature buck was regularly passing within range of our stand. Scouting is a skill as much, if not more, than calling, shooting, and other hunting activities. With hunting season rapidly approaching, I wished to share some of my techniques for scouting using trail cameras. A neat thing about trail cameras is that they allow us to scout for individual deer, not just deer sign in general.
For example, finding scat, tracks, and evidence of browsing is great, but they don’t tell us with confidence if they were left by a buck or doe, or how mature the deer was. They also don’t tell us the time of day the deer was present. Trail cameras allow us to scout for a specific gender and/or age class of deer.
Knowing that deer need food, cover, and water, I typically use my Reconyx cameras to monitor food as quality food is usually in limited distribution during deer season in many areas. I also monitor other areas such as travel corridors. However, I don’t place my Reconyx cameras near my stands. The camera itself doesn’t spook deer, but me installing and retuning to check the camera can condition the deer, especially mature bucks, to avoid the area during daylight hours.
That’s why I typically monitor larger fields or feeding areas where I can approach in a truck and not walk very far to install and tend the camera. In addition, large openings are ideal for using the time lapse feature. Time lapse is simply taking an image of the opening every 15 minutes or so. This allows me to pattern deer using the field even if they are further from the camera than the detection area. Even though I might not be able to score a buck at 100+ yards in a trail camera image, I can identify him as a hit list candidate or not. This is another reason I use Reconyx units as the time lapse and auto detection systems will work simultaneously – giving me the best of both features!
The time lapse feature allows me to really limit disturbance in a possible hunting area and the detection mode gives images of outstanding image quality. Combining the advantage of scouting with a trail camera and knowing where a preferred food source is located is an outstanding technique. By using an electric fence and creating a gap in the fence, it’s relatively easy to pattern when and exactly where deer will approach a desirable food source. This is especially true during the late season when unprotected food sources have been consumed.
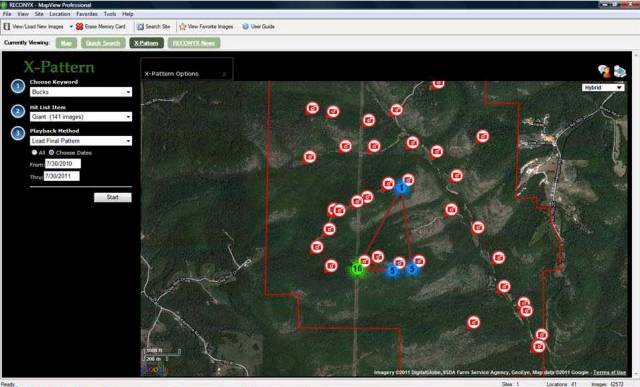
Organizing and making sense of the gads of trail camera images can be a sizable task. I know as I literally review 100,000+ Reconyx images from my place each year. Based on that experience, I provided Reconyx with suggestions of my dream tool to help organize the images and help me pattern mature bucks. This great scouting tool is provided free with Reconyx units and in my opinion is worth as much as the camera. It converts the data in the images to great maps that allow me to visually see how mature bucks are using my property and pick stand sites accordingly. A huge advantage of organizing images with this tool is that maps from all camera locations can be compared at once – not going back and forth looking at images on my laptop.
I used these maps last year to have an encounter with Giant 10 – the buck with the largest antlers at The Proving Grounds. I also used the maps generated by BuckView to find Giant 10’s sheds and to help one of my guests harvest a mature buck during the first day of her hunt.
As you prepare to hunt this year, consider using these scouting techniques and prepare to have some planned encounters with mature bucks at your Proving Grounds!
For more details about how to use trail cameras to scout, check out GDTV 66.
Growing (and patterning) Deer together,
Grant


